
Share the article


Choosing the Proper Die Springs
Extend operating life with well-chosen Dayton Lamina die springs
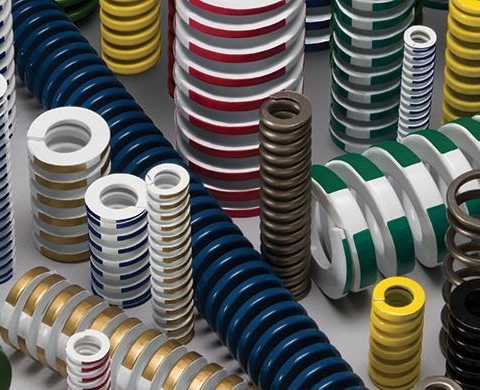
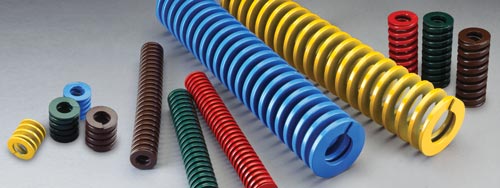
Die springs, an essential stamping die component, create the optimal pressure for restraining the sheet material in a fixed position while it is being pierced, formed, flanged, or trimmed. The springs also provide controlled return pressure for the die stripper to permit the punches and other die-mounted tools to evacuate the material during the press' return stroke.
Die springs are most commonly used to actuate strippers, but they can also be found behind form pressure pads and binder rings in draw dies. The goal is to provide adequate die spring pressure within the limited remaining space of the die.
Spring Selection Process
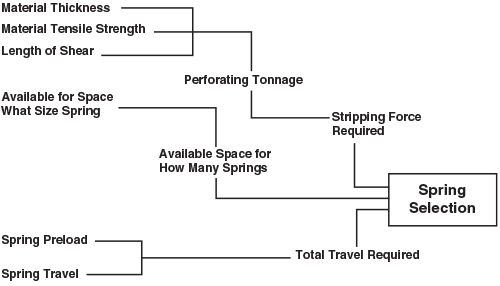
To select a die spring, you first should gather information about three different aspects of the die design: how much pressure is needed; what spring size and how many are needed to produce that pressure; and how far these springs must collapse or travel.
Pressure Requirements
To determine spring pressure for a spring used in a stripper, first calculate the perforating pressure for the entire die. To do this, you need to know the thickness and shear strength of the part material as well as the length of shear or cutting distance. These elements multiplied together will give you the perforating pressure. The formula reads:
Perforating pressure = S × T × L
Where:
- S = Shear strength of the part material
- T = Part material thickness
- L = Total length of shear or cutting distance
A pressure equal to 10 to 15% of the total perforating pressure typically is used to actuate the stripper (the range accommodates the potential differences among spring manufacturers). This allows for the downward ram speed to align safely and engage the die shoe components into their guided, mated components before material contact.
Spring Stripper
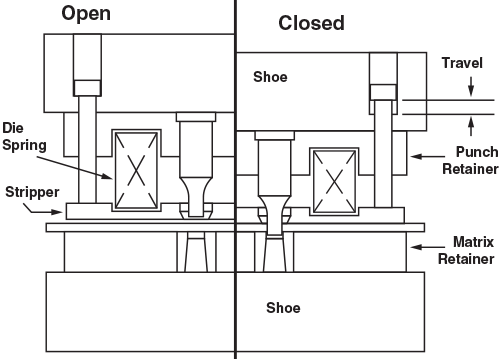
As the ram moves down, the stripper makes contact with the part material and stops. The spring continues to compress, or travel, until the ram reaches the bottom of its stroke.
Stripping pressure = Perforating pressure × 0.10 to 0.15
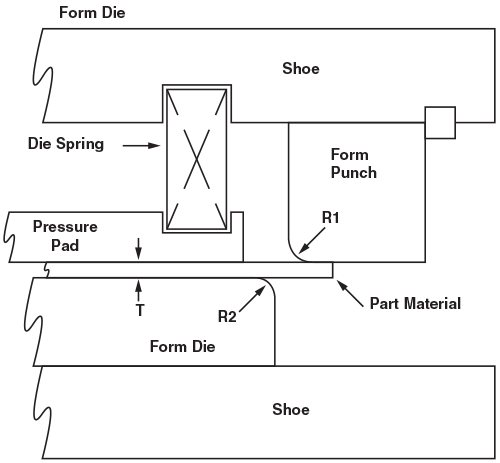
Although the formula for determining pad pressure in a form die is different from that of a stripper, it must still contain the same three elements of (1) pressure, (2) quantity and size of springs, and (3) the travel. The pad pressure in a forming operation should be at least 1.5 times greater than the force required for bending the part.
Bending pressure = ((S × 0.166 × T2) / (T + R1/2 + R2/2)) × L
Where:
- S = Tensile strength
- T = Material thickness
- R1 = Radius on form punch
- R2 = Radius on form die
- L = Length of form
Pad pressure = Bending pressure × 1.5
A forming operation requires more pad pressure than a bending operation because of the need to control sheet material movement over the forms and maintain its new shape. The pad pressure also helps to prevent material from scoring or tearing as it is being formed.
Pressure requirements for binder rings in draw dies tend to be less scientific, determined by trial and error. It is not uncommon to find a note on a draw die design stating the spring requirement as "springs to suit."
As the binder ring holds the material in its locating position, the spring pressure required tends to be adjusted to eliminate the tearing and shearing that may occur while the material is being drawn or stretched. A too-high spring pressure will inhibit the drawing of the material, while too little pressure will draw material up the form and fail to provide a uniform wall thickness.
Spring Size and Quantity
The amount of available space in the die will help determine how many springs to use and what sizes to choose. Whenever possible, try using numerous low-pressure springs rather than a few high-pressure springs. This will reduce stress on the springs.
As long as the tool layout permits the necessary space, more springs of lower pressure allow for more evenly distributed pressure and a more balanced stripper pad. This enhances sheet material control throughout the complete press stroke. Also, if just one die spring becomes fatigued, the die pad will continue to operate with the other springs.
Die spring placement, when applicable, should be nearest the area being pierced, formed, flanged, or trimmed. This enhances the ability to locate the most pressure on the area being worked upon while maintaining sheet material control. The use of spring cams, retainer bolts, or spring pockets serve to guard the springs from debris and protect the tool die details in the event of a fatigued or broken die spring.
Travel Requirements
When springs are installed in a die, they are compressed approximately 0.125 inch. Called preload, this compression is necessary to keep the springs from working their way out of the die. As a side benefit, the preload reduces the shock associated with rapid loading and unloading of the die and increases the spring life.
The bottom of the stripper draws up just short of being flush with the end of the punch. This ensures that the part material strips completely off the end of the punch. When the press cycle starts, the ram begins to move downward. The stripper makes contact with the part material and stops. As the ram continues descending, the springs compress, allowing the punches to extend through the part material and into the die button until the ram reaches the bottom of its stroke. This compression is called stripper travel.
The travel of a spring is determined by the spring preload, thickness of the material, entry of the punch into the die button, and the distance the stripper hangs below the bottom of the punch. Put simply, preload plus the stripper travel equals the total spring travel.
The same is true in form and draw dies. Pressure pads or binder rings will also travel and compress the springs. Preload plus travel of the stripper or comparable component will give you the total travel of the spring.
To reduce stress and allow for maximum spring life, you should keep preload and travel to a minimum. The more rapidly a spring works in compressing and decompressing, the greater the fatigue factor. Slower-spring applications permit longer spring travels, longer spring life, and the ability to operate near maximum spring deflection levels. The faster a die spring cycles, the shorter the spring life expectancy. In such fast cycling applications, you should lower the spring deflection.
Spring Selection
Now that you know the pressure, approximate size, and travel, you can begin the actual spring selection process. This starts by combining the three aspects of the die design. First, divide the total stripping force required by the number of springs to be used.
The selected spring must deliver the desired pressure at preload. To determine the pressure of the spring at a given preload, multiply the amount of preload by the amount of pressure the spring develops over one inch. Most spring catalogs give pressure ratings over one inch as well as various other amounts of compression or travel.
Keep in mind that the spring must offer sufficient travel within its normal operating range. For example, the maximum operating range of a medium-pressure spring is approximately 50% of the free, or static, length. The efficient operating range of this spring is between 10 and 35% of the free length. Higher-pressure springs will have a shorter range of travel.
Although springs will compress beyond the maximum operating range, you should avoid this at all cost. Compressing beyond maximum range will severely hinder spring life and could damage the die. It is also a good idea to choose a spring with extra travel to prevent over-traveling the spring after a tool has been re-sharpened.
Tough Under Pressure
Whatever your application might be, you can be sure that die springs from Dayton Lamina provide rugged, dependable performance. The brands of Dayton, Lamina, Danly-IEM, and Lempco offer a wide selection of NAAMS, ISO, and JIS standard springs.
Share the article